上一篇 介绍了 UI 设计系统实现中的原子级别如 color、font、padding、radius 等的管理方式,本篇主要来介绍设计系统中分子级别和细胞级别,也就是一些最基本和常见的 widget 和自定义的 widget 。它们在整个项目大量重复的去使用,来看看它们在 UI 设计系统是如何封装的呢。
我们在写 UI 界面的时候,经常会遇到很多 widget 它们长得很像,却又有一些细微的差别,比如说在很多页面都会出现的操作 button,有提交表单数据 primary button,也有其它交互的操作的 secondary button 等等,但是这些按钮之间只有背景颜色、显示文案及用户点击的回调的区别。
这个时候应该怎么做呢?先来说一说前三种做法,第一种在页面上每一个用到按钮的位置直接使用,第二种就是为每种按钮类型创建一个小的 Widget
1 2 3 4 5 6 7 8 9 10 11 12 13 14 15 16 17 18 19 20 21 22 23 24 25 26 27 28 29 30 31 32 33 34 35 36 37 38 39 40 41 42 43 @override Widget build(BuildContext context) { return Scaffold( backgroundColor: const Color(0xffffffff ), body: Center( child: Column( children: [ TextButton( child: const Text('Primary Button' ), onPressed: () {}, ), ], ))); } class CenteredTextButton1 extends StatelessWidget final Function () onPressed; final bool isEnabled; const CenteredTextButton1( {Key? key, required this .onPressed, required this .isEnabled}) : super (key: key); @override Widget build(BuildContext context) { return TextButton( onPressed: onPressed, child: Container( alignment: Alignment.center, height: 45 , width: 160 , decoration: BoxDecoration( borderRadius: const BorderRadius.all(Radius.circular(4 )), border: Border.all(color: Colors.white38), color: isEnabled ? const Color(0xF80231E5 ) : const Color(0xFF7F7F7F )), child: const Text("Primary Button" )), ); } }
第三种就是在第二种的基础上将抽取一个父类,将相同属性和操作放在父类,不同的放在子类,但是不太推荐这么做,至少是在这种情况下不推荐,本来就是一个简单的 widget 的封装,搞个父类会让 widget 的维护变复杂了。而第一种和第二种做法也可以,但在整个项目中会有大量重复代码,代码重用性不好,有没有更好的做法呢?这里使用的是 widget 工厂。
这里同样以文案居中的 button 为例,下面来创建一个类名为 CenteredTextButton 的自定义button 组件,它包含了两个工厂方法:primary 和 secondary,分别用于创建两个不同样式的按钮。每个工厂方法内部通过调用 CenteredTextButton._internal 构造函数来创建按钮实例,并根据传入的参数设置按钮的样式和行为。
1
2
3
4
5
6
7
8
9
10
11
12
13
14
15
16
17
18
19
20
21
22
23
24
25
26
27
28
29
30
31
32
33
34
35
36
37
38
39
40
41
42
43
44
45
46
47
48
49
50
51
52
53
54
55
56
57
58
59
60
61
62
63
64
65
66
67
68
69
70
71
72
73
74
75
class CenteredTextButton extends StatelessWidget final String label; final bool isPrimary; final bool isEnabled; final Function () onPressed; final Color color; final Color disabledColor; const CenteredTextButton._internal({ super .key, required this .label, required this .isPrimary, required this .isEnabled, required this .onPressed, required this .color, required this .disabledColor, }); factory CenteredTextButton.primary({ Key? key, required String label, bool isEnabled = true , required Function () onTap, required BuildContext context, }) { return CenteredTextButton._internal( key: key, label: label, isPrimary: true , isEnabled: isEnabled, onPressed: onTap, color: Theme.of(context).appColors.buttonPrimaryBgColor, disabledColor: Theme.of(context).appColors.buttonDisabledBgColor, ); } factory CenteredTextButton.secondary({ Key? key, required String label, bool isEnabled = true , required Function () onTap, required BuildContext context, }) { return CenteredTextButton._internal( key: key, label: label, isPrimary: false , isEnabled: isEnabled, onPressed: onTap, color: Theme.of(context).appColors.buttonSecondaryBgColor, disabledColor: Theme.of(context).appColors.buttonDisabledBgColor, ); } @override Widget build(BuildContext context) { return InkWell( splashFactory: NoSplash.splashFactory, highlightColor: Colors.white.withOpacity(0 ), onTap: isEnabled ? onPressed : null , child: Container( alignment: Alignment.center, height: 45 , width: 160 , decoration: BoxDecoration( borderRadius: const BorderRadius.all(Radius.circular(4 )), color: color), child: Text( label, style: Theme.of(context).appTexts.labelTextDefault.copyWith( color: Theme.of(context).appColors.centeredButtonTextColor), )), ); } }
这里是的颜色和文本样式的定义放在了是上一篇介绍的 AppColorsTheme 和 AppTextsTheme。使用的定制性更高的 InkWell 来作为响应用户点击的容器组件,NoSplash.splashFactory 去掉点击时的水波纹效果。在页面中使用:
1
2
3
4
5
6
7
8
9
10
11
12
13
Column( mainAxisAlignment: MainAxisAlignment.center, crossAxisAlignment: CrossAxisAlignment.center, children: [ CenteredTextButton.primary( label: "Primary Button" , onTap: () {}, context: context), const SizedBox( height: 20 , ), CenteredTextButton.secondary( label: "Secondary Button" , onTap: () {}, context: context) ], )
每个工厂中仅添加必要的参数,使得代码更简单并避免代码重复,那这样实现有什么好处呢?将每个工厂中的通用属性分组,不必每次在应用程序中需要相同的小 widget 时重复这些通用属性,管理起来也方便统一。而且这样写也很方便拓展更多的小 widget ,只需要添加一个新工厂就可以轻松添加新的小部件,如:CenteredTextButton.tertiary 也可以有自己的特定参数值。
除了上面的 button,还有没有其它的 widget 也可以这么设计呢?当然有,而且很多,比如文本、文本输入和图片等等,甚至 widget 之间的间隙(gap),都可以使用上述做法来设计。
文本显示:
AppText.labelLargeEmphasis(...)AppText.labelDefaultEmphasis(...)
文本输入:
AppTextField.text()AppTextField.search()AppTextField.number()AppTextField.email()AppTextField.password()
你可能会问 widget 之间的间隙不是可以通过 padding、margin 来实现吗,还需要单独重新设计一系列的 gap ?我自己的经验是,所有的 widget 之间的间隙尽量是可见的,意思就是单独把间隙用 SizedBox 来表示,尽量避免子小部件内隐藏的间隙和间距,除非是特殊情况必须得这么做。下面代码实现封装的各种 gap。
1
2
3
4
5
6
7
8
9
10
11
12
13
14
15
16
17
18
19
20
21
22
23
24
25
26
27
28
29
30
31
32
import 'package:flutter/material.dart' ;class VerticalGap extends StatelessWidget final double height; const VerticalGap._internal({ super .key, required this .height, }); factory VerticalGap.formHuge({Key? key}) => VerticalGap._internal(key: key, height: 32 ); factory VerticalGap.formBig({Key? key}) => VerticalGap._internal(key: key, height: 24 ); factory VerticalGap.formMedium({Key? key}) => VerticalGap._internal(key: key, height: 16 ); factory VerticalGap.formSmall({Key? key}) => VerticalGap._internal(key: key, height: 8 ); factory VerticalGap.formTiny({Key? key}) => VerticalGap._internal(key: key, height: 4 ); factory VerticalGap.custom(double height, {Key? key}) => VerticalGap._internal(key: key, height: height); @override Widget build(BuildContext context) => SizedBox(height: height); }
这个就很好理解了,就是将多个基础 widget 组合成一个复合 widget,从而实现更复杂的功能或UI布,这里的参与组合的 widget 既有系统的也有上面内容里自定义的 widget,所以组合的 widget 在设计系统中可以属于分子级别也可以是细胞级别。下面来实现一个自定义 AppBar 的例子 :
1
2
3
4
5
6
7
8
9
10
11
12
13
14
15
16
17
18
19
20
21
22
23
24
25
26
27
28
29
30
31
32
import 'package:flutter/material.dart' ;import 'package:widgets/button/app_bar_button.dart' ;class CustomAppBar extends StatelessWidget implements PreferredSizeWidget final String title; final IconData leadingIcon; final VoidCallback onLeadingPressed; final List <Widget>? actions; const CustomAppBar({ Key? key, required this .title, required this .leadingIcon, required this .onLeadingPressed, this .actions, }) : super (key: key); @override Widget build(BuildContext context) { return AppBar( title: Text(title), leading: AppBarButton.leading( text: "Back" , onTap: onLeadingPressed, ), actions: actions, ); } @override Size get preferredSize => const Size.fromHeight(kToolbarHeight); }
上面代码中的 AppBarButton 就是我们自己的封装的 widget ,CustomAppBar 组件内部使用了 AppBar 和一些内置的 Widget(如 Text )还有我们自定义的,来实现的布局和样式。这种 widget 的组合封装小到一个 AppBar,有些情况下也可以大到一个页面。好处就是在应用中重复使用这个自定义的组合 widget,而不需要重复编写相似的代码,提高了代码的复用性和可维护性。
自定义绘制是属于设计系统中细胞级别的,项目中我们常使用 CustomPainter 来做自定义绘制,因为有的时候 Flutter 内置组件无法满足特定设计需求,亦或者在需要绘制复杂图形、图表及各种特殊的效果、动画等场景下,同时自定义绘制可以实现更高效的渲染,尤其是绘制大量图形或动画时,可以减少 Flutter 框架的开销,提高性能。下面用 CustomPainter 绘制一个不规则形状的按钮。
1
2
3
4
5
6
7
8
9
10
11
12
13
14
15
16
17
18
19
20
21
22
23
24
25
26
27
28
29
30
31
32
33
34
35
36
37
38
39
40
41
42
43
44
45
46
47
48
class IrregularButton extends StatelessWidget final double width; final double height; final Color color; final VoidCallback onPressed; const IrregularButton({ Key? key, required this .width, required this .height, required this .color, required this .onPressed, }) : super (key: key); @override Widget build(BuildContext context) { return GestureDetector( onTap: onPressed, child: CustomPaint( size: Size(width, height), painter: _IrregularButtonPainter(color), ), ); } } class _IrregularButtonPainter extends CustomPainter final Color color; _IrregularButtonPainter(this .color); @override void paint(Canvas canvas, Size size) { final Paint paint = Paint()..color = color; final Path path = Path() ..moveTo(0 , 0 ) ..lineTo(size.width, 0 ) ..lineTo(size.width * 0.8 , size.height) ..lineTo(0 , size.height * 0.6 ) ..close(); canvas.drawPath(path, paint); } @override bool shouldRepaint(covariant CustomPainter oldDelegate) => false ; }
在项目架构中的位置
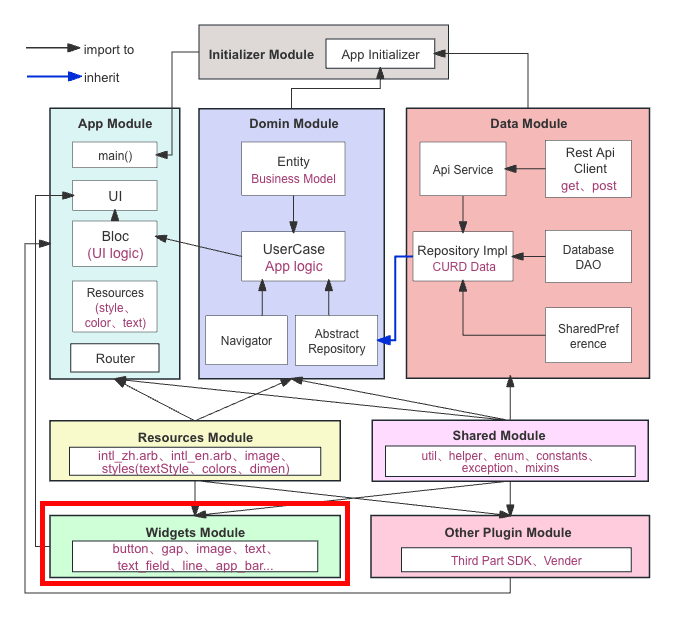
从上面的架构图可以看出,上面介绍的通过工厂、组合和自定义绘制的widget (分子级别和细胞级别)是放在了 widgets 组件包内的,widgets 组件内部会依赖于 resources 组件和 shared 组件。在主工程中添加对 widgets 的依赖就可以直接使用。
1
2
3
dependencies: resources: path: ../resources
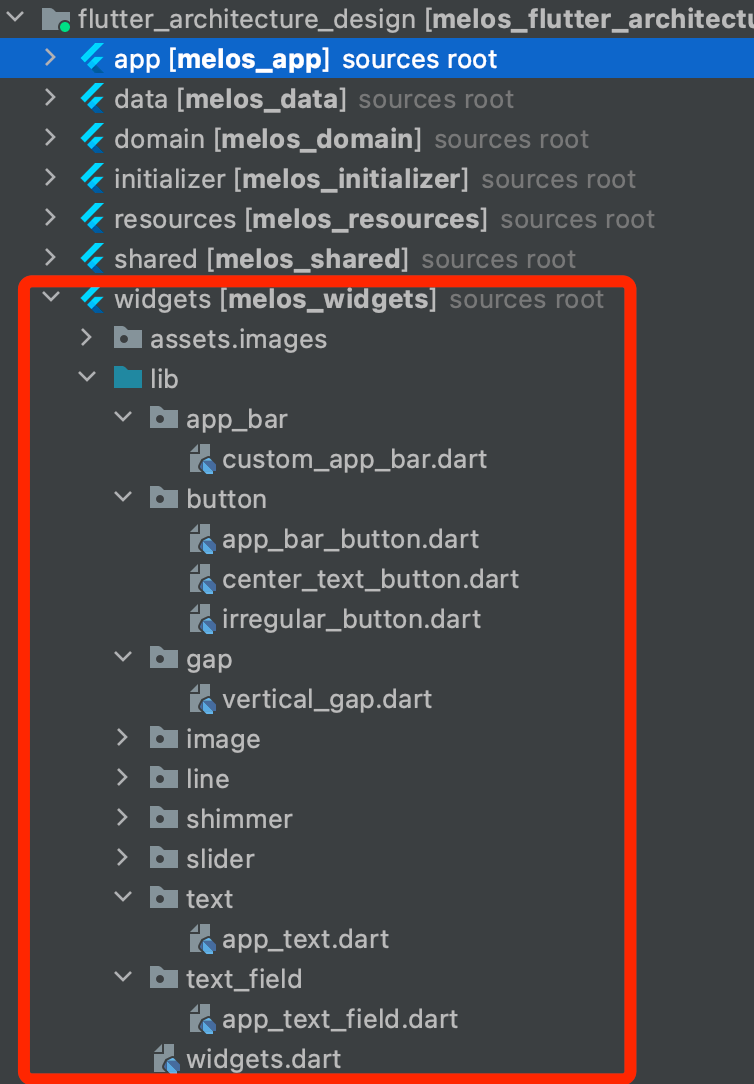
下图是 widgets 组件内部的文件结构:
小结 UI 设计系统除了在代码层的实现,还需要 UI 设计师定义一套 UI 组件的设计规范和风格来做配合,以确保界面的一致性和美观性。本文上面和上一篇介绍的 widget 封装方法只是提供一种参考。好了,今天的分享就到这里,《Flutter大型项目架构》系列已经更新到第五篇,本系列的下一篇来介绍大型项目中网络层是如何设计和实现的,感谢您的阅读,记得关注加点赞哦!


