0%

这么好看的 Flutter 搜索框,快来看看是怎么实现的

最近项目中在实现一个搜索的功能,根据 Flutter 的类似组件的调用习惯,输入 showSearch 后发现还真有,跳进源码中一看,Flutter 已经实现了相应的 Widget 和交互,简直不要太方便了,先来看看如何调用的。

showSearch 方法介绍

1
2
3
4
5
6
7
8
9
10
11
12
13
14
15
Future<T?> showSearch<T>({
required BuildContext context,
required SearchDelegate<T> delegate,
String? query = '',
bool useRootNavigator = false,
}) {
assert(delegate != null);
assert(context != null);
assert(useRootNavigator != null);
delegate.query = query ?? delegate.query;
delegate._currentBody = _SearchBody.suggestions;
return Navigator.of(context, rootNavigator: useRootNavigator).push(_SearchPageRoute<T>(
delegate: delegate,
));
}
复制

上面函数定义在源码 flutter/lib/src/material/search.dart 文件中,根据该函数要求须传入一个 contextdelegatecontext 是我们的老朋友,这里就无需过多介绍了。但是这个 delegate (SearchDelegate 类)是干啥的?继续跳到 SearchDelegate 发现SearchDelegate 是一个抽象类,SearchDelegate 第一句介绍 Delegate for [showSearch] to define the content of the search page. 定义搜索页面的内容,也就是说需要我们创建一个继承自 SearchDelegate 的子类来实例化参数 delegate,下面是这个子类CustomSearchPageDelegate的代码。

1
2
3
4
5
6
7
8
9
10
11
12
13
14
15
16
17
class CustomSearchPageDelegate extends SearchDelegate<String> {
// 搜索框右边的显示,如返回按钮
@override
List<Widget>? buildActions(BuildContext context) {}

// 搜索框左边的显示,如搜索按钮
@override
Widget? buildLeading(BuildContext context) {}

// 搜索的结果展示,如列表 ListView
@override
Widget buildResults(BuildContext context) {}

// 输入框输入内容时给出的提示
@override
Widget buildSuggestions(BuildContext context) {}
}
复制

从上面可以看出我们需要返回4个 Widget 来显示内容,其中 buildLeadingbuildActions 分别对应搜索框左右两边的内容,通常是 button,如 buildLeading 是返回按钮,buildActions 右边是搜索按钮。buildResults 则表示搜索的结果展示,通常是一个列表,而 buildSuggestions 展示当用户在输入框输入内容时给出的提示,展示多条提示内容时也会用到列表(ListView)。

实现 CustomSearchPageDelegate

接下来以搜索文章为例子利用自定义的CustomSearchPageDelegate 类实现一下搜索功能。

1
2
3
4
5
6
7
8
9
10
11
12
13
14
15
16
17
18
19
20
21
22
23
24
25
26
27
28
29
30
31
32
33
34
35
36
37
38
39
40
41
42
43
44
45
46
47
48
49
50
51
52
53
54
55
56
57
58
59
60
61
62
63
64
65
66
67
68
69
70
71
72
73
74
75
76
77
78
79
80
81
82
83
84
85
86
87
88
89
90
91
92
93
94
95
96
97
98
99
100
101
102
103
104
105
106
107
108
109
110
111
112
113
114
115
116
117
118
119
120
121
122
123
124
125
126
127
128
129
130
131
132
133
134
135
136
137
138
139
140
141
142
143
144
145
146
147
148
149
150
151
152
153
154
155
156
157
158
159
160
161
162
163
164
165
166
167
168
169
170
171
172
173
174
175
176
177
178
179
180
181
import 'package:flutter/material.dart';
import 'package:flutter_svg/flutter_svg.dart';
import 'package:flutter_todo/pages/search_page/data_item_model.dart';
import 'package:flutter_todo/pages/search_page/search_item_widget.dart';

class CustomSearchPageDelegate extends SearchDelegate<DataItemModel> {
CustomSearchPageDelegate({
String? hintText,
required this.models,
}) : super(
searchFieldLabel: hintText,
keyboardType: TextInputType.text,
textInputAction: TextInputAction.search,
);

/// 搜素提示
List<String> suggestions = [
"Flutter",
"Flutter开发7个建议,让你的工作效率飙升",
"浅谈 Flutter 的并发和 isolates",
"Flutter 技术实践",
"Flutter 中如何优雅地使用弹框",
"Flutter设计模式全面解析:单例模式",
"Flutter Dart",
"Flutter 状态管理",
"Flutter大型项目架构:UI设计系统实现(二)",
"Flutter大型项目架构:分层设计篇",
"Dart 语法原来这么好玩儿"
];

/// 模拟数据,一般调用接口返回的数据
List<DataItemModel> models = [];

/// 搜索结果
List<DataItemModel> results = [];

/// 右边的搜索按钮
@override
List<Widget>? buildActions(BuildContext context) {
return [
InkWell(
onTap: () {},
child: Container(
margin: const EdgeInsets.all(10),
height: 30,
alignment: Alignment.center,
decoration: BoxDecoration(
color: Colors.red, borderRadius: BorderRadius.circular(30)),
padding: const EdgeInsets.symmetric(vertical: 0, horizontal: 16),
child: const Text(
"搜索",
style: TextStyle(color: Colors.white, fontSize: 14),
),
),
),
];
}

/// 左边返回按钮
@override
Widget? buildLeading(BuildContext context) {
return InkWell(
onTap: () {
/// 返回操作,关闭搜索功能
/// 这里应该返回 null
close(context, DataItemModel());
},
child: Container(
padding: const EdgeInsets.all(15.0),
child: SvgPicture.asset(
"assets/images/arrow.svg",
height: 22,
color: Colors.black,
),
));
}

/// 搜索结果列表
@override
Widget buildResults(BuildContext context) {
return ListView.separated(
physics: const BouncingScrollPhysics(),
itemCount: results.length,
itemBuilder: (context, index) {
DataItemModel item = results[index];
/// 自定义Widget,用来显示每一条搜素到的数据。
return SearchResultItemWidget(
itemModel: item,
click: () {
/// 点击一条数据后关闭搜索功能,返回该条数据。
close(context, item);
},
);
},
separatorBuilder: (BuildContext context, int index) {
return divider;
},
);
}

/// 提示词列表
@override
Widget buildSuggestions(BuildContext context) {
List<String> suggestionList = query.isEmpty
? []
: suggestions
.where((p) => p.toLowerCase().contains(query.toLowerCase()))
.toList();
if (suggestionList.isEmpty) return Container();
return ListView.separated(
itemBuilder: (context, index) {
String name = suggestionList[index];
return InkWell(
onTap: () {
/// 点击提示词,会根据提示词开始搜索,这里模拟从models数组中搜索数据。
query = name;
results = models
.where((e) =>
(e.title?.toLowerCase().contains(name.toLowerCase()) ??
false) ||
(e.desc?.toLowerCase().contains(name.toLowerCase()) ??
false))
.toList();

/// 展示结果,这个时候就调用 buildResults,主页面就会用来显示搜索结果
showResults(context);
},
child: Container(
color: Colors.white,
padding: const EdgeInsets.symmetric(vertical: 15, horizontal: 10),
child: Row(
children: [
SvgPicture.asset(
"assets/images/search.svg",
height: 16,
color: const Color(0xFF373737),
),
const SizedBox(
width: 4,
),
RichText(
text: TextSpan(children: getSpans(name)),
),
],
),
),
);
},
itemCount: suggestionList.length,
separatorBuilder: (BuildContext context, int index) {
return divider;
},
);
}

/// 分割线
Widget get divider => Container(
color: const Color(0xFFAFAFAF),
height: 0.3,
);

/// 富文本提示词,其中如果和输入的文本匹配到的关键字显示红色。
List<TextSpan> getSpans(String name) {
int start = name.toLowerCase().indexOf(query.toLowerCase());
String end = name.substring(start, start + query.length);
List<String> spanStrings = name
.toLowerCase()
.replaceAll(end.toLowerCase(), "*${end.toLowerCase()}*")
.split("*");
return spanStrings
.map((e) => (e.toLowerCase() == end.toLowerCase()
? TextSpan(
text: e,
style: const TextStyle(color: Colors.red, fontSize: 14))
: TextSpan(
text: e,
style:
const TextStyle(color: Color(0xFF373737), fontSize: 14))))
.toList();
}
}
复制

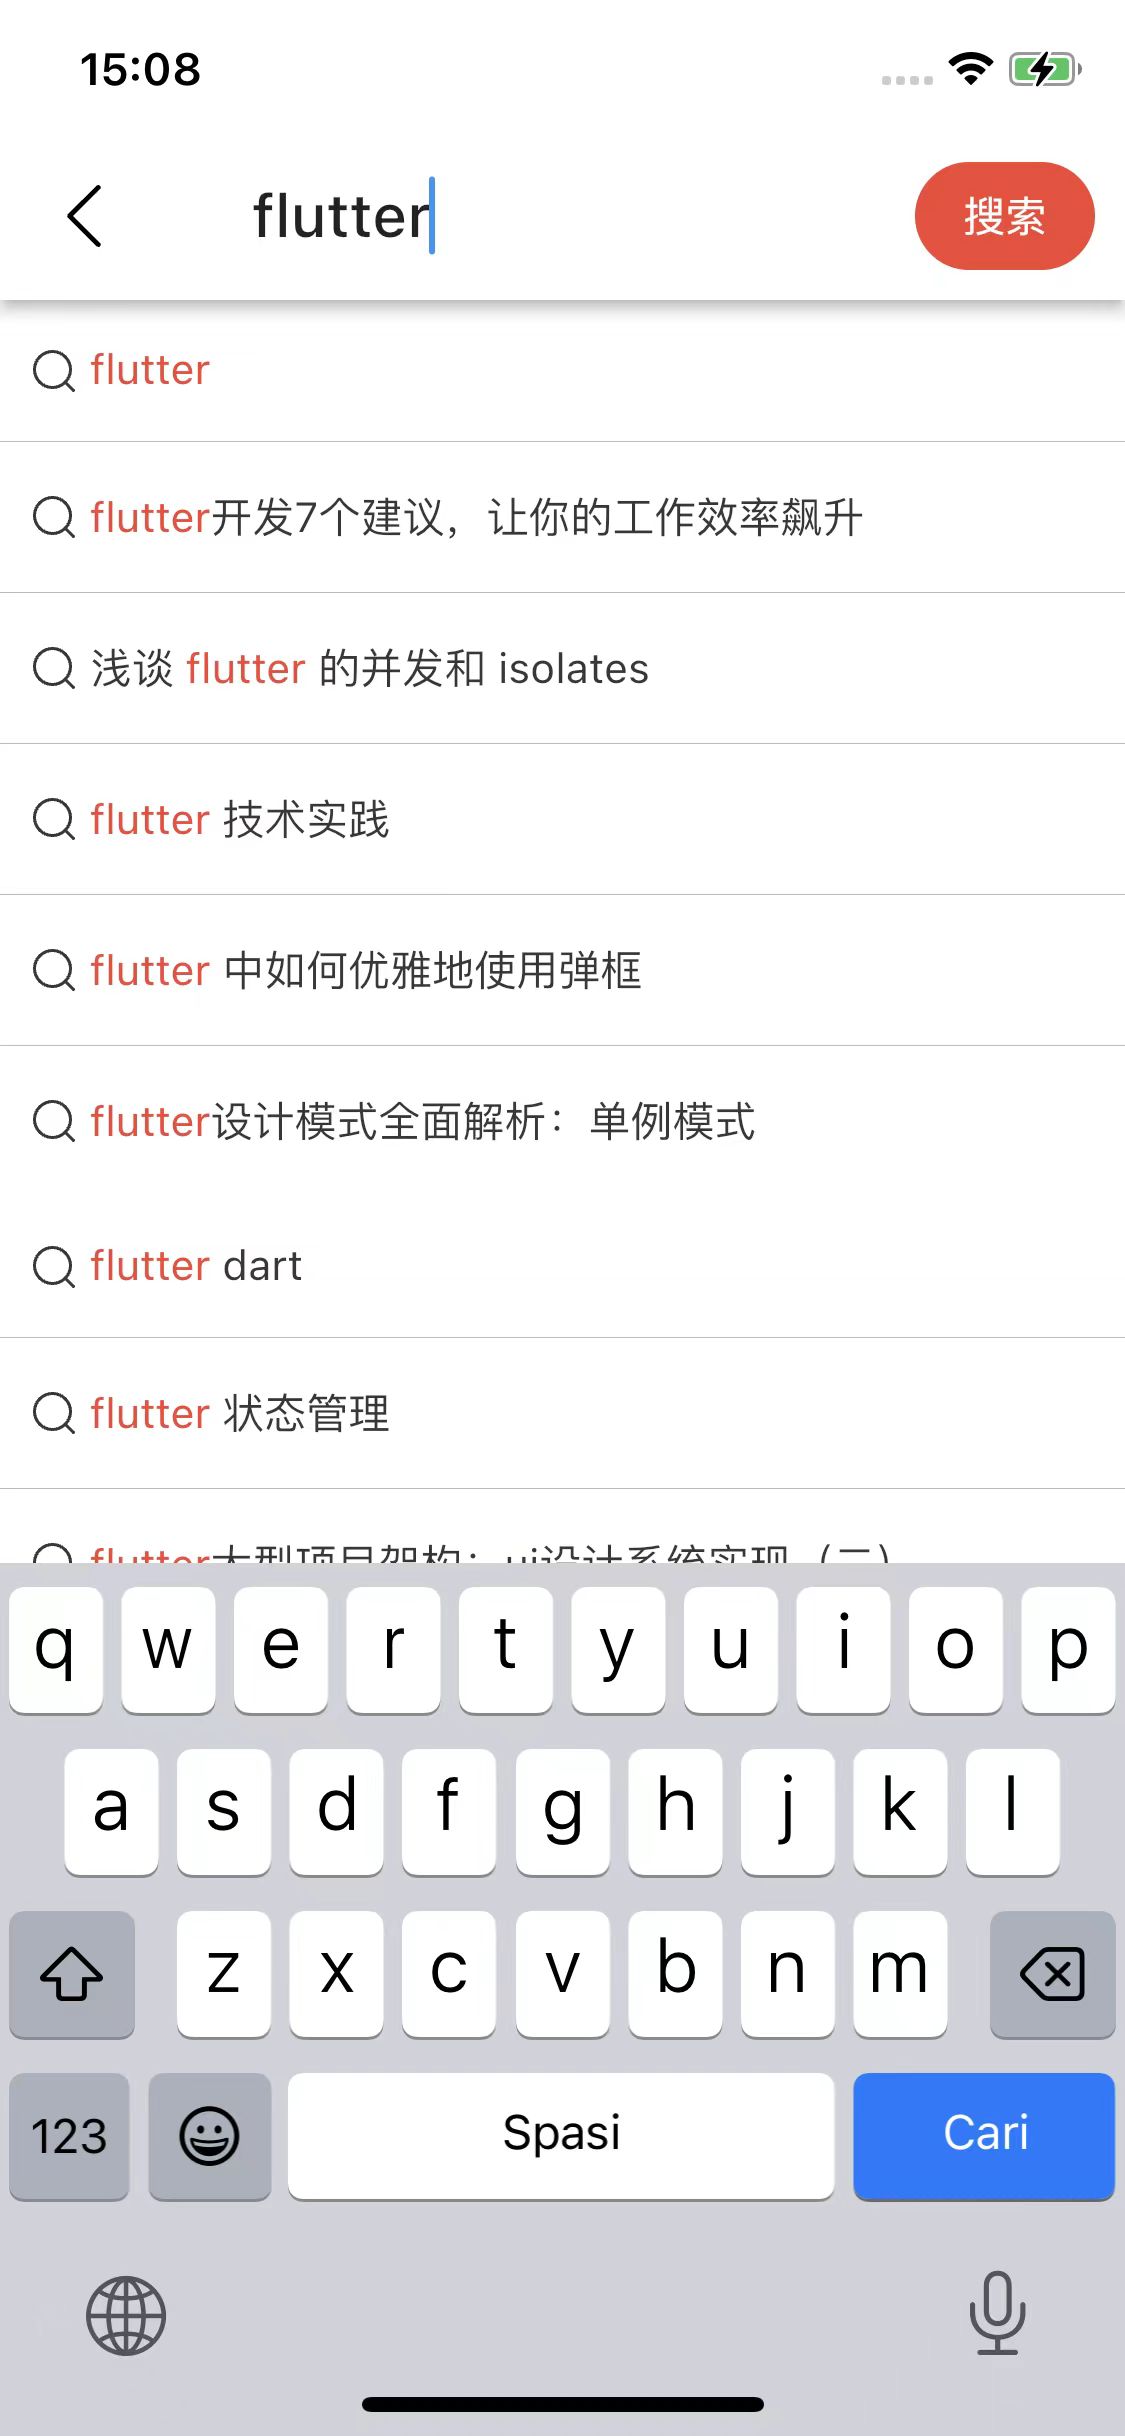
这里要说明一下,query 关键字是输入框的文本内容。调用的时候实例化一下该类,传递给 shwoSearchdelegate 参数。下图就是我们看到的效果:
521730704175_.pic.jpg

总结问题

以上图片的搜索框还可以通过重写 appBarTheme 来定制自己想要的 UI 效果,虽然可以这样,但是和我们要实现的效果比起来还相差甚远,尤其是顶部的搜索框,其左右两边的留白区域过多,背景颜色无法调整,内部的输入框 TextField 也无法定制自己想要的效果,如不能调整其圆角、背景颜色以及添加额外控件等等。

还有一点就是当我们点击返回按钮调用 close 时,这里返回值是泛型 T 却不支持 null 类型,在文章的开头,我们可以看到 shwoSearchdelegate 参数类型是 SearchDelegate<T>,所以创建 CustomSearchPageDelegate 时必须这样去声明。

1
class CustomSearchPageDelegate extends SearchDelegate<DataItemModel>
复制

而我们想要实现这样去声明

1
class CustomSearchPageDelegate extends SearchDelegate<DataItemModel?>
复制

这样当我们调用 close 时可以做到传 null,在外面调用的位置可以对返回值进行判断,返回值为 null 就不作任何处理。

交互上,在点击键盘上的 搜索 按键时,直接调用的是 showResults 函数,而通常的操作是需要调用搜索的接口拿到数据后,再去调用 showResults 函数来展示搜索结果的数据。

对于上述问题,我们可以做什么呢?

源码分析

想要到达我们需要的效果,还是需要看看 Flutter 的源码是怎么实现的,我们再次来到 flutter/lib/src/material/search.dart 文件中,可以看到该文件中定义了除上面提到的抽象类 SearchDelegate 和全局函数 showSearch 之外,还有内部类 _SearchPageRoute_SearchPage_SearchPageRoute 继承自 PageRoute,顾名思义就是负责路由跳转及转场动画的。

以下是 _SearchPageRoute 部分代码:

1
2
3
4
5
6
7
8
9
10
11
12
13
14
15
16
17
18
19
20
21
22
23
24
25
class _SearchPageRoute<T> extends PageRoute<T> {
_SearchPageRoute({
required this.delegate,
}) : assert(delegate != null) {
delegate._route = this;
}

final SearchDelegate<T> delegate;

/// ...

@override
Widget buildPage(
BuildContext context,
Animation<double> animation,
Animation<double> secondaryAnimation,
) {
return _SearchPage<T>(
delegate: delegate,
animation: animation,
);
}

/// ...
}
复制

重写父类的 buildPage 方法,将 delegate 传递给 _SearchPage 并将其返回,而所有的 UI 逻辑都在这个 _SearchPage 中,来到 _SearchPagebuild 函数中就可以看到下面的实现。

_SearchPagebuild 函数代码

1
2
3
4
5
6
7
8
9
10
11
12
13
14
15
16
17
18
19
20
21
22
23
24
25
26
27
28
29
30
31
32
33
34
35
36
37
38
39
40
41
42
43
44
45
46
47
48
49
50
51
52
53
54
55
56
57
58
59
@override
Widget build(BuildContext context) {
assert(debugCheckHasMaterialLocalizations(context));
final ThemeData theme = widget.delegate.appBarTheme(context);
final String searchFieldLabel = widget.delegate.searchFieldLabel
?? MaterialLocalizations.of(context).searchFieldLabel;
Widget? body;
// _currentBody 枚举类型_SearchBody,用来区分当前body是展示提示列表还是搜索结果列表,
// 当调用 SearchDelegate 中 showResults 函数时,_currentBody = _SearchBody.results
// 当调用 SearchDelegate 中 showSuggestions 函数时,_currentBody = _SearchBody.suggestions
switch(widget.delegate._currentBody) {
case _SearchBody.suggestions:
body = KeyedSubtree(
key: const ValueKey<_SearchBody>(_SearchBody.suggestions),
child: widget.delegate.buildSuggestions(context),
);
break;
case _SearchBody.results:
body = KeyedSubtree(
key: const ValueKey<_SearchBody>(_SearchBody.results),
child: widget.delegate.buildResults(context),
);
break;
case null:
break;
}

return Semantics(
explicitChildNodes: true,
scopesRoute: true,
namesRoute: true,
label: routeName,
child: Theme(
data: theme,
child: Scaffold(
appBar: AppBar(
leading: widget.delegate.buildLeading(context),
title: TextField(
controller: widget.delegate._queryTextController,
focusNode: focusNode,
style: widget.delegate.searchFieldStyle ?? theme.textTheme.titleLarge,
textInputAction: widget.delegate.textInputAction,
keyboardType: widget.delegate.keyboardType,
onSubmitted: (String _) {
widget.delegate.showResults(context);
},
decoration: InputDecoration(hintText: searchFieldLabel),
),
actions: widget.delegate.buildActions(context),
bottom: widget.delegate.buildBottom(context),
),
body: AnimatedSwitcher(
duration: const Duration(milliseconds: 300),
child: body,
),
),
),
);
}
复制

_SearchPage 中的实现也非常简单,就是一个嵌入到 AppBar 中的搜索框和呈现 suggestion listresult listbody。想要定制自己的 UI 效果,改的也是该位置的代码。

优化实现

UI 方面主要针对 TextFieldAppBar 代码修改,怎么改就看想要实现什么效果了。参考 Flutter 官方的源码,重新实现一个的 _SearchPage 类,然后在 _SearchPageRoute 替换成自己写的 _SearchPage,再去 SearchDelegate 替换一下修改过的 _SearchPageRoute

还一个问题怎么实现调用 close 时可以返回 null 的结果内呢?除了上面提到的这样去声明

1
class CustomSearchPageDelegate extends SearchDelegate<DataItemModel?>
复制

之外,还需要修改 _SearchPageRoute

1
2
3
4
// 改之后
final CustomSearchDelegate<T?> delegate;
// 改之前
// final CustomSearchDelegate<T> delegate;
复制

重新定义一个全局函数 showSearchWithCustomiseSearchDelegate,和官方的区分开来。

1
2
3
4
5
6
7
8
9
10
11
12
13
14
15
Future<T?> showSearchWithCustomiseSearchDelegate<T>({
required BuildContext context,
// 这里的泛型由原来的 T 改成了 T?
required CustomSearchDelegate<T?> delegate,
String? query = '',
bool useRootNavigator = false,
}) {
delegate.query = query ?? delegate.query;
delegate._currentBody = _SearchBody.suggestions;
// 这里的 _SearchPageRoute 是我们自己实现的类
return Navigator.of(context, rootNavigator: useRootNavigator)
.push(_SearchPageRoute<T>(
delegate: delegate,
));
}
复制

来看看最终调用上面的函数

1
2
3
4
5
6
7
8
DataItemModel? result =
await showSearchWithCustomiseSearchDelegate(
context: context,
delegate: SearchPageDelegate(
hintText: "Flutter 技术实践", models: models));
if (result != null) {
/// to detail page
}
复制

解决交互上的问题,需要在我们自己抽象类 SearchDelegate 单独定义一个函数 onSubmit,点击键盘上的搜索按键和右边的搜索按钮调用 onSubmit 函数,如:widget.delegate.onSubmit(context, text);,在 SearchDelegate 子类的 onSubmit 中来实现具体的逻辑,如发送网络请求,返回数据后在调用 showResults

1
2
3
4
5
@override
void onSubmit(BuildContext context, String text) {
// 发送网络请求,拿到数据。
// showResults(context);
}
复制

整体实现的代码量多,就不在文中贴出来了,具体实现大家可以参考这里的代码:

1
https://github.com/joedrm/flutter_todo/blob/master/lib/pages/search_page/search_page_delegate.dart
复制

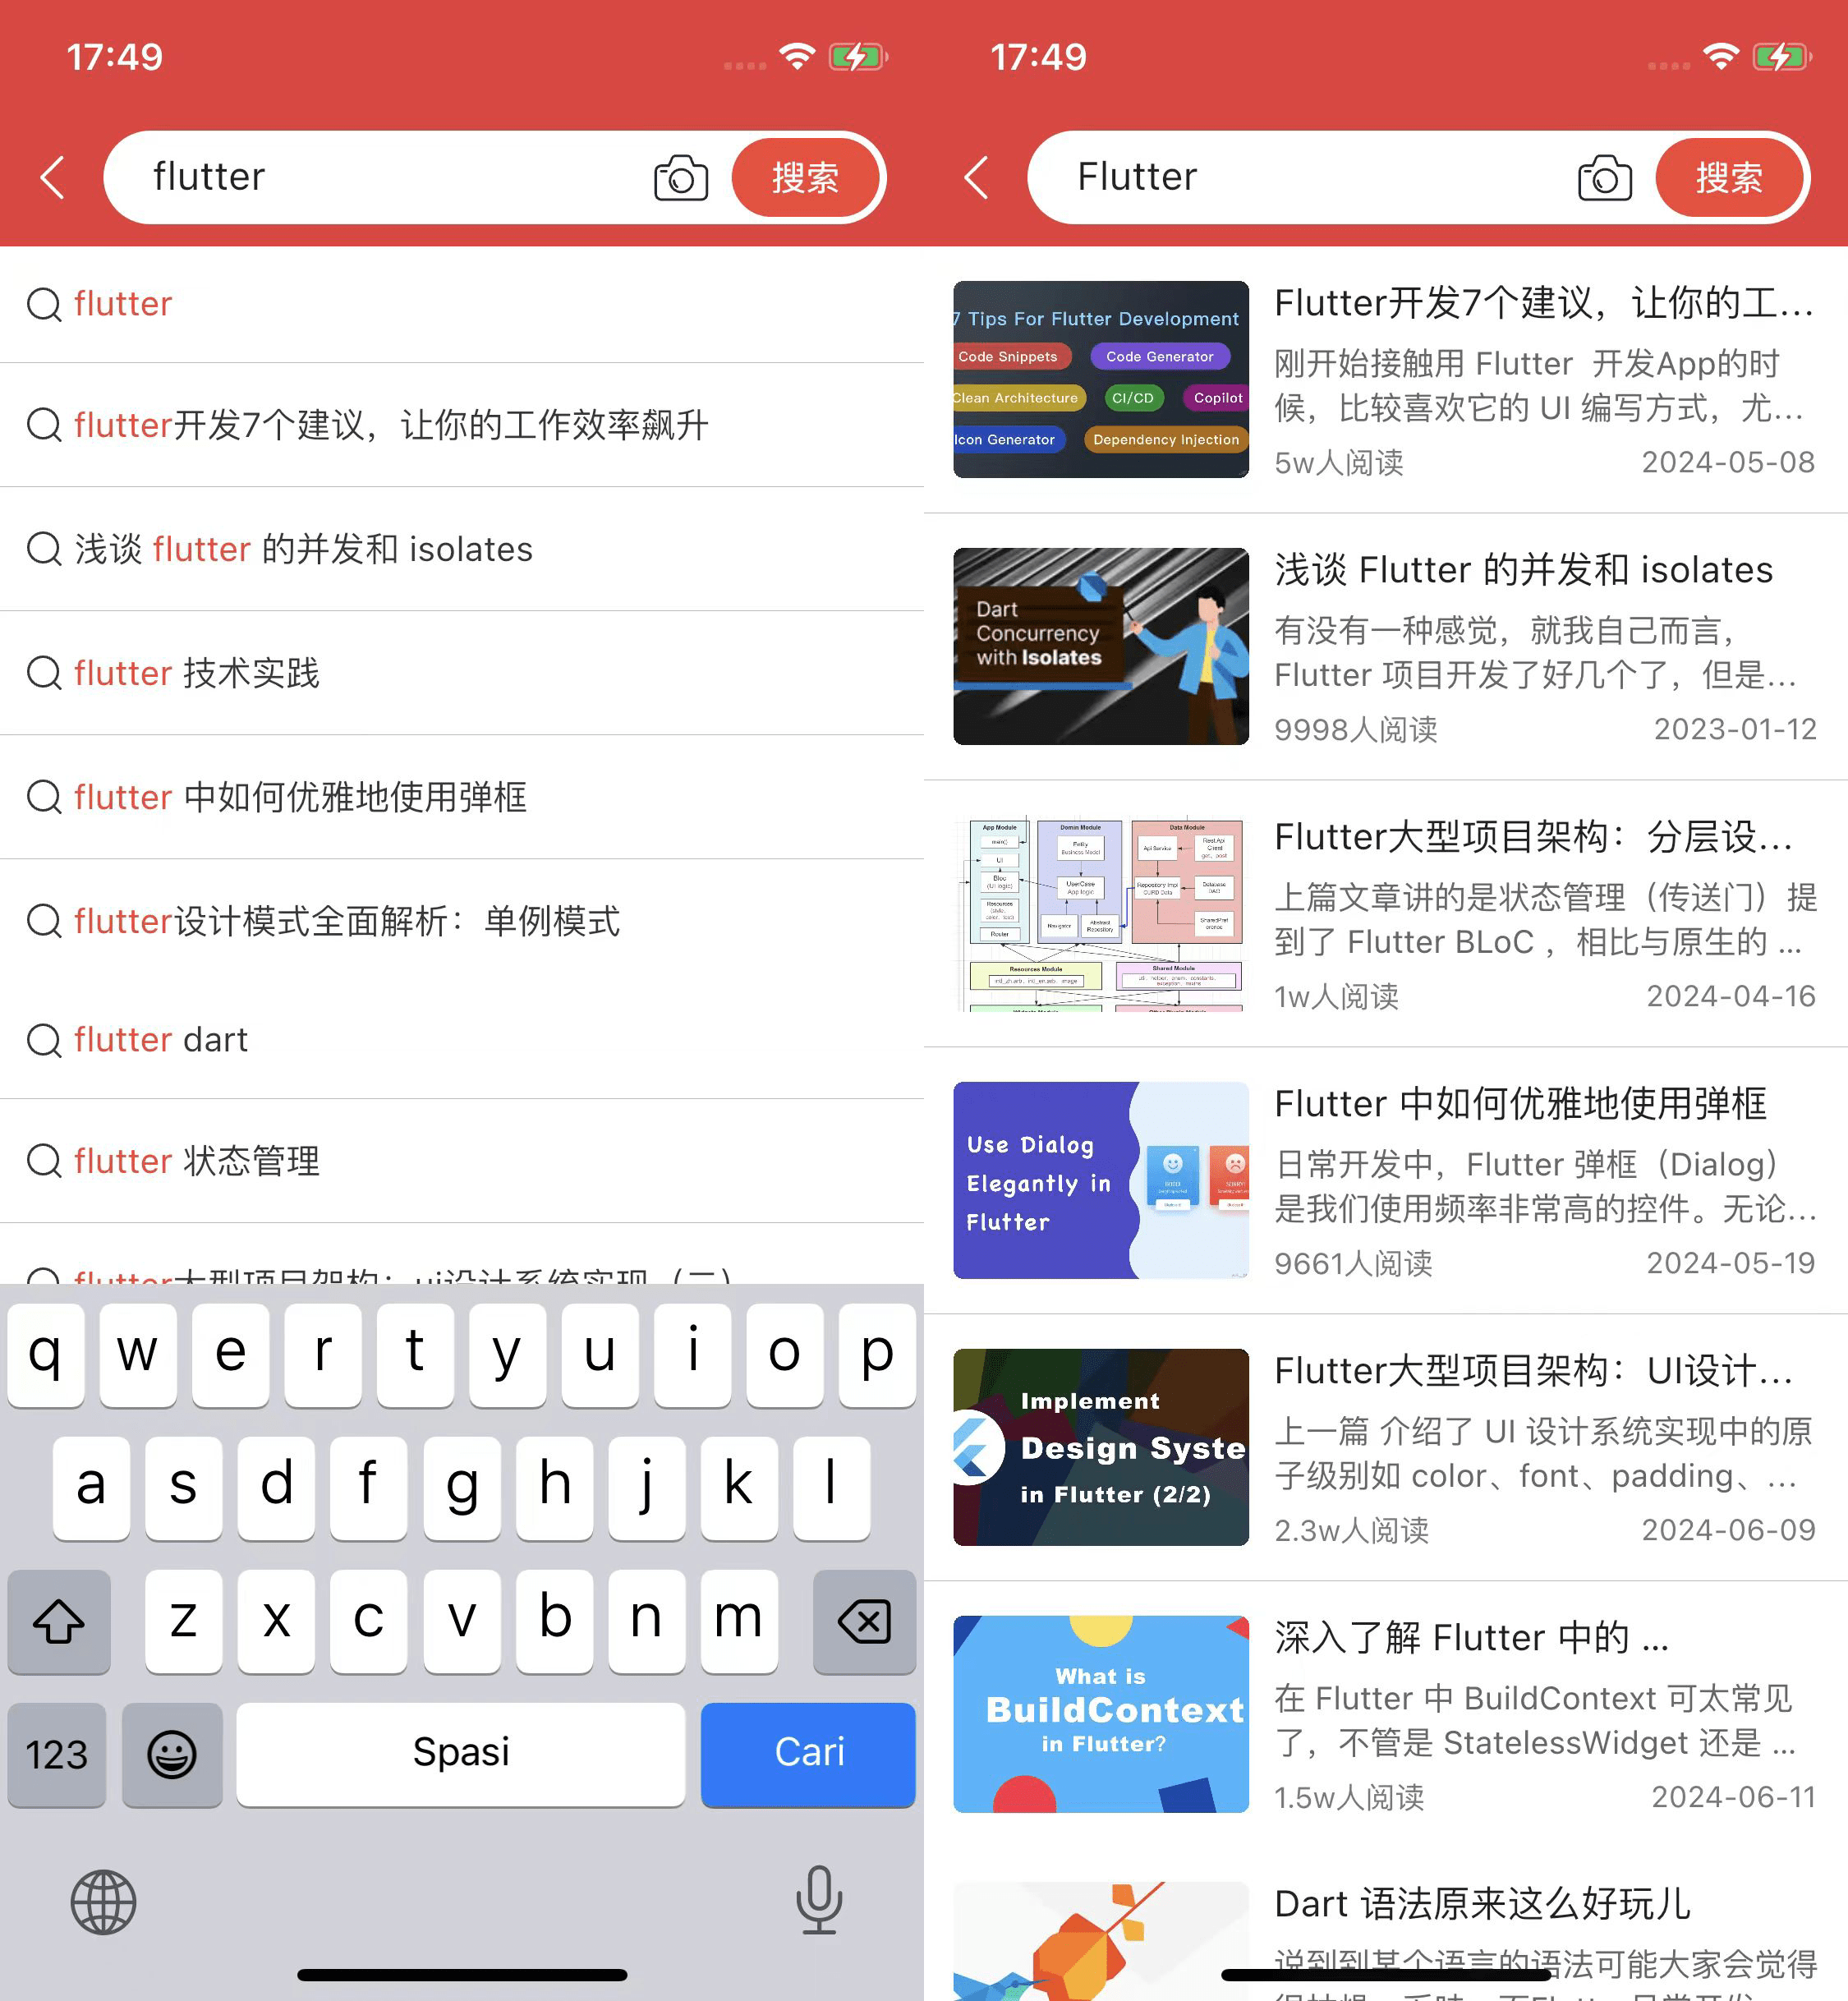
下图是最终实现效果:

小结

自定义搜索框的实现整体来说还是比较简单的,相比于源码改动的地方并不多,就可以显示想要的效果。当然还有其它更多的实现方式,这里只是提供了一种分析思路。我们还可以发散一下,去看看其它的如:showBottomSheetshowDialog 等等和 SearchDelegate,他们直之间也有不少类似的地方,当我想要自定义自己的控件时,会发现其实很多答案就在官方的源码里,动手改吧改吧就出来了。最后聊一下近况,近期有一些想法在忙着实现,时间有点安排不过来,文章的更新就有点儿偷懒了,跟大家说声抱歉,后面有机会单独来分享一下最近忙的事情,最后感谢大家耐心的阅读!

Powered By Valine
v1.5.2